What’s new in Basecamp
We’ve given group Pings a little makeover! The updated design shows avatars arranged in a circle, giving every group conversation a fresh new look.
And for larger groups, there’s another improvement. Before, you’d only see four avatars in the preview with no quick way to see how many other people were included. Now, there’s a number showing how many people are in the conversation.

You’ve always been able to see overdue to-dos from your Reports page. The only problem? To-dos aren’t the only things with due dates.
So, we’ve expanded the report and given it a new name: Overdue tasks. You’ll now see overdue to-dos, cards, and subtasks, too. You can narrow things down by type or use the filter to zero in on what you’re looking for.
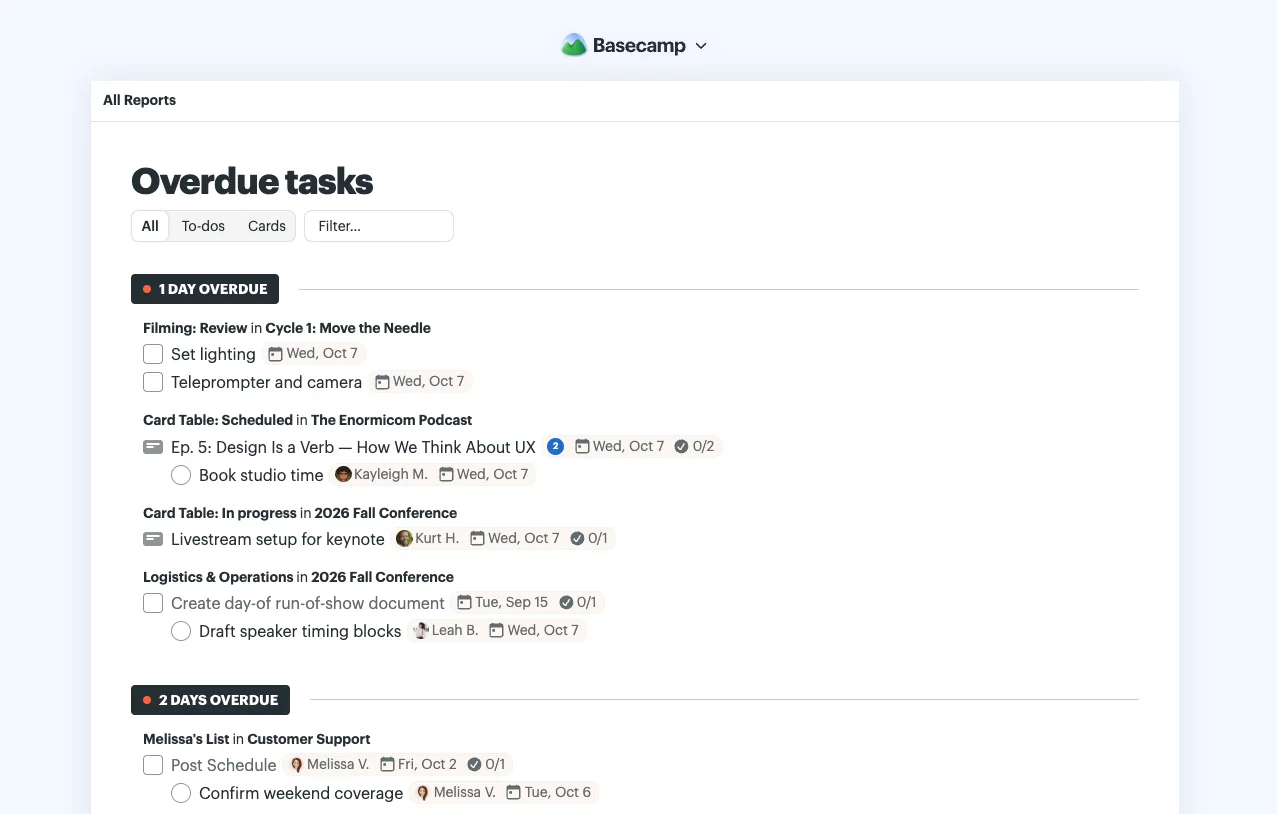
Find Overdue tasks with a quick search from the Jump menu (Shift + J), or head to Reports at the top of the Basecamp menu.
For those of you using AI agents with Basecamp, there’s a new version of the Basecamp CLI with even more capabilities.
With version 0.12, agents can better organize Docs & Files, manage subtasks, set up and adjust automatic check-ins, and work more naturally with Markdown and Basecamp links.
There’s plenty more under the hood, too. Ask your agent to upgrade to the latest version and you’re ready to go.
Moving a bunch of cards from one Card Table to another used to mean moving them one by one. Not exactly ideal when you’ve got an entire column to move.
Now you can move or copy an entire column, including all the cards inside it, in one go.
To get started, click the name of a column, then use the ••• menu at the top right and select Move or Copy. Choose where you want the column to go and you’re all set!
Reorganizing a bunch of cards at once is now a breeze.
To-do lists don’t always start in Basecamp. You might jot down some tasks in a text file, build out a project plan in Markdown, or have your favorite robot whip up a checklist for you. 🤖
Now, you can take a list of tasks you’ve created somewhere else and bring it right in. No need to build it again from scratch! Simply drag a .txt, .md, or .markdown file from your computer onto the To-dos tool, and your to-dos will automatically be created.
Bullets become to-dos, indented bullets become subtasks, and anything already checked off is marked complete. The import happens quietly, so no one will be notified when to-dos are added. Once they’re in, you can assign them to people, set due dates, or add notes like you normally would.
Now, a little dragging and dropping can save you a whole lot of typing.
Sometimes you need to keep an eye on more than one chat at a time. Maybe you’re following conversations across a few active projects or bouncing between different teams.
Before, you had to switch between projects to view each chat. With Bonfire, you can see multiple chats from different projects, all on one page.
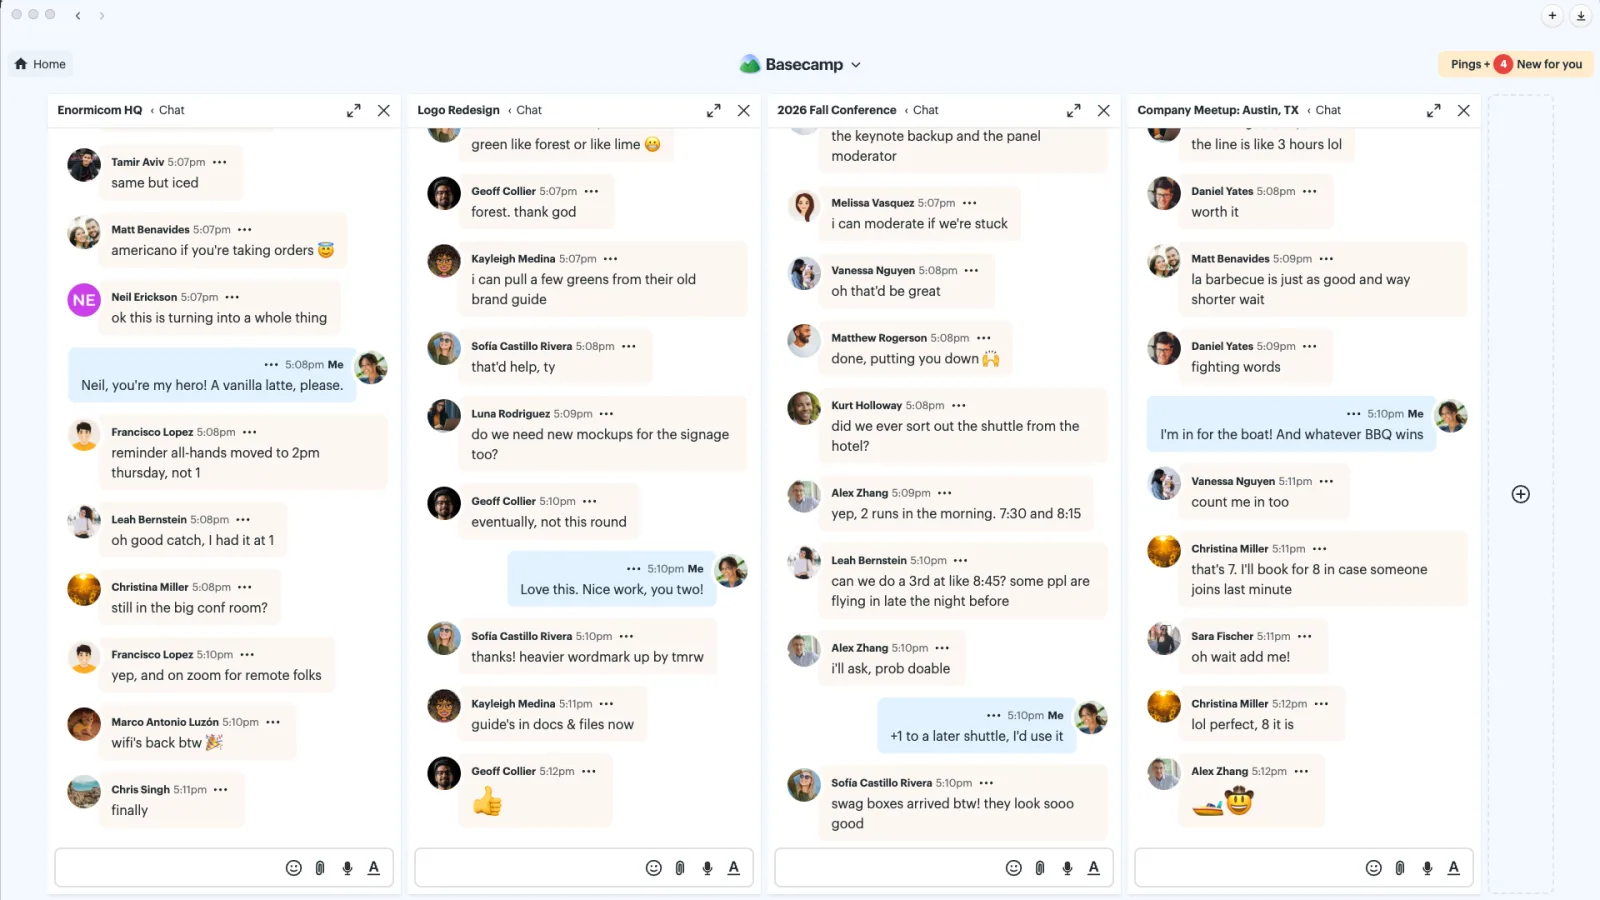
Open the ••• menu in any chat and select View in Bonfire to get started. From there, add more chats with the + button, drag them into the order you like, or close the ones you no longer need. Hold Shift and press C to jump from one chat to the next.
Once you’ve set up your Bonfire, you can get back to it anytime from the Jump menu. Click the Basecamp logo at the top (or press Shift + J), then search for Bonfire.
Want to see it in action? Take a look at this quick video:
When a conversation gets busy, it isn’t always obvious which comment someone is responding to. Is that “Sounds good!” for the new deadline, the latest design, or something three comments back? 🤔
That’s where comment replies come in. You can reply directly to specific comments, so there’s no confusion about what you’re responding to. It works on to-dos, messages, files, cards, events, and anywhere you can comment in Basecamp.
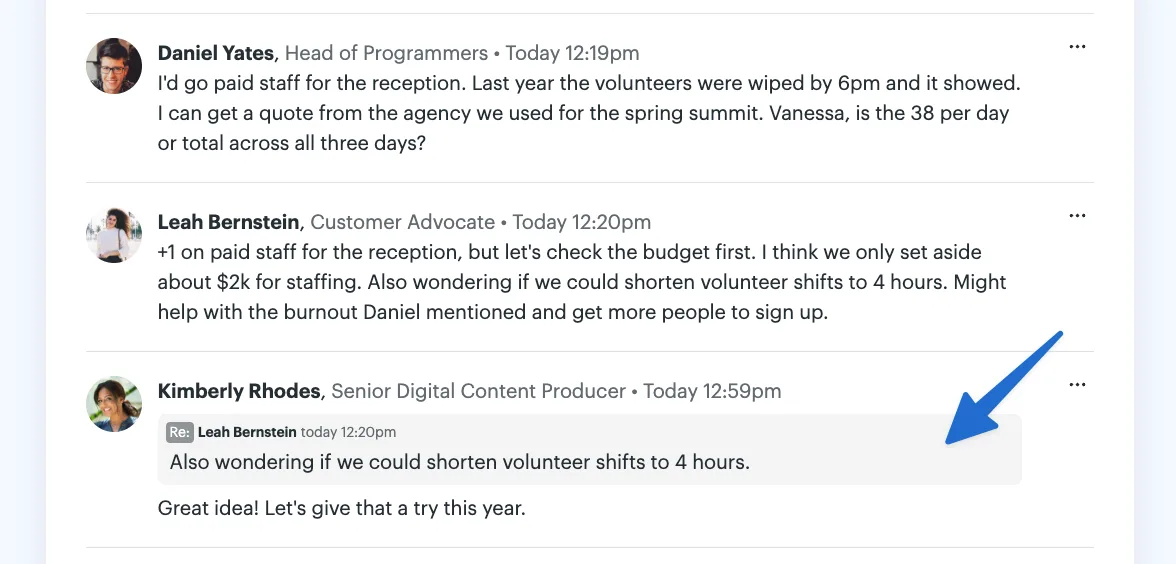
Hover over a comment and click Reply to quote the whole thing, then add your response. Or, highlight just the part you want to respond to and click Reply to quote only that portion. Your reply will include the quoted text, making it clear exactly what you’re responding to.
You can select and quote part of a message in Pings and Chats, too. Just highlight the bit you want to respond to before clicking the ••• menu and choosing Reply.
The new reply options are available on the web and in the desktop apps. Check out this quick video to see the updates in action.
Every project is a little different, so why should they all look the same? Now you can add custom wallpaper to any project, giving each one its own look. Add a client’s logo, a photograph, or simply choose something that makes the project unmistakable.
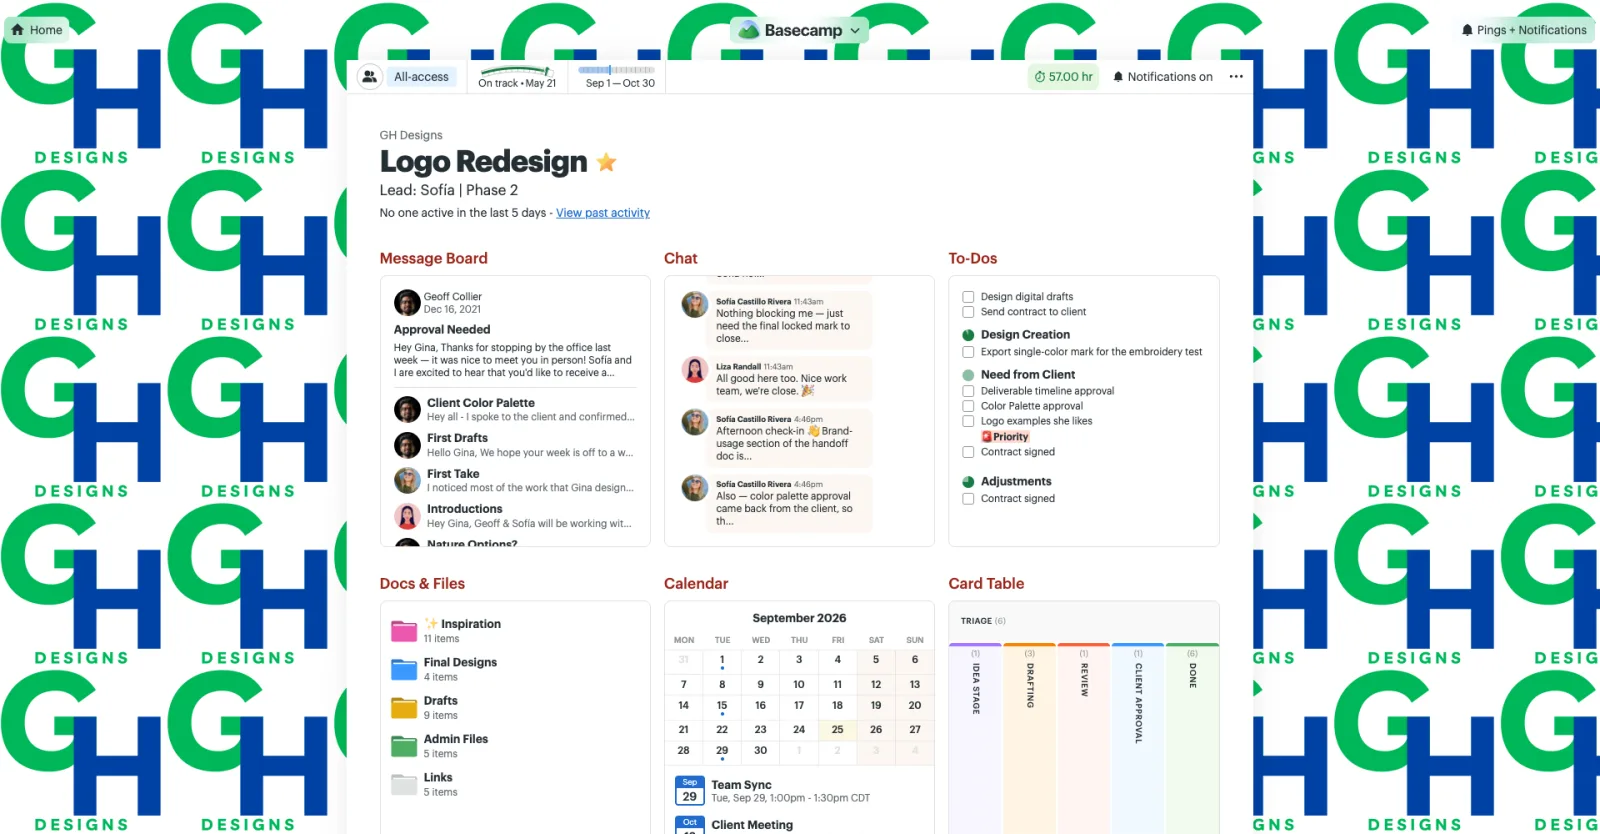
Add a client’s logo as wallpaper...
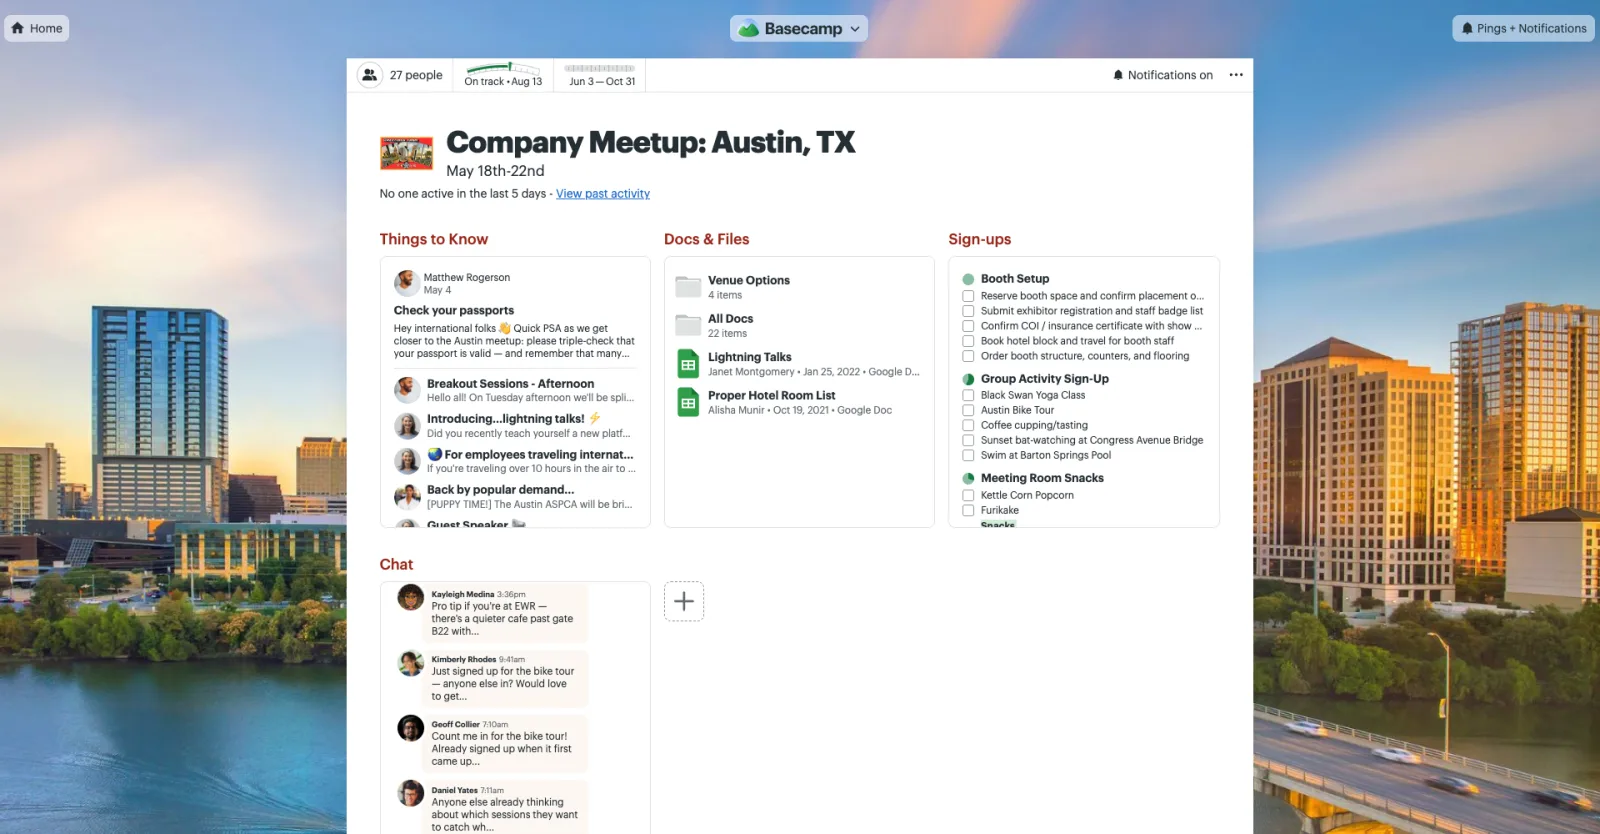
Or upload a fullscreen photograph!
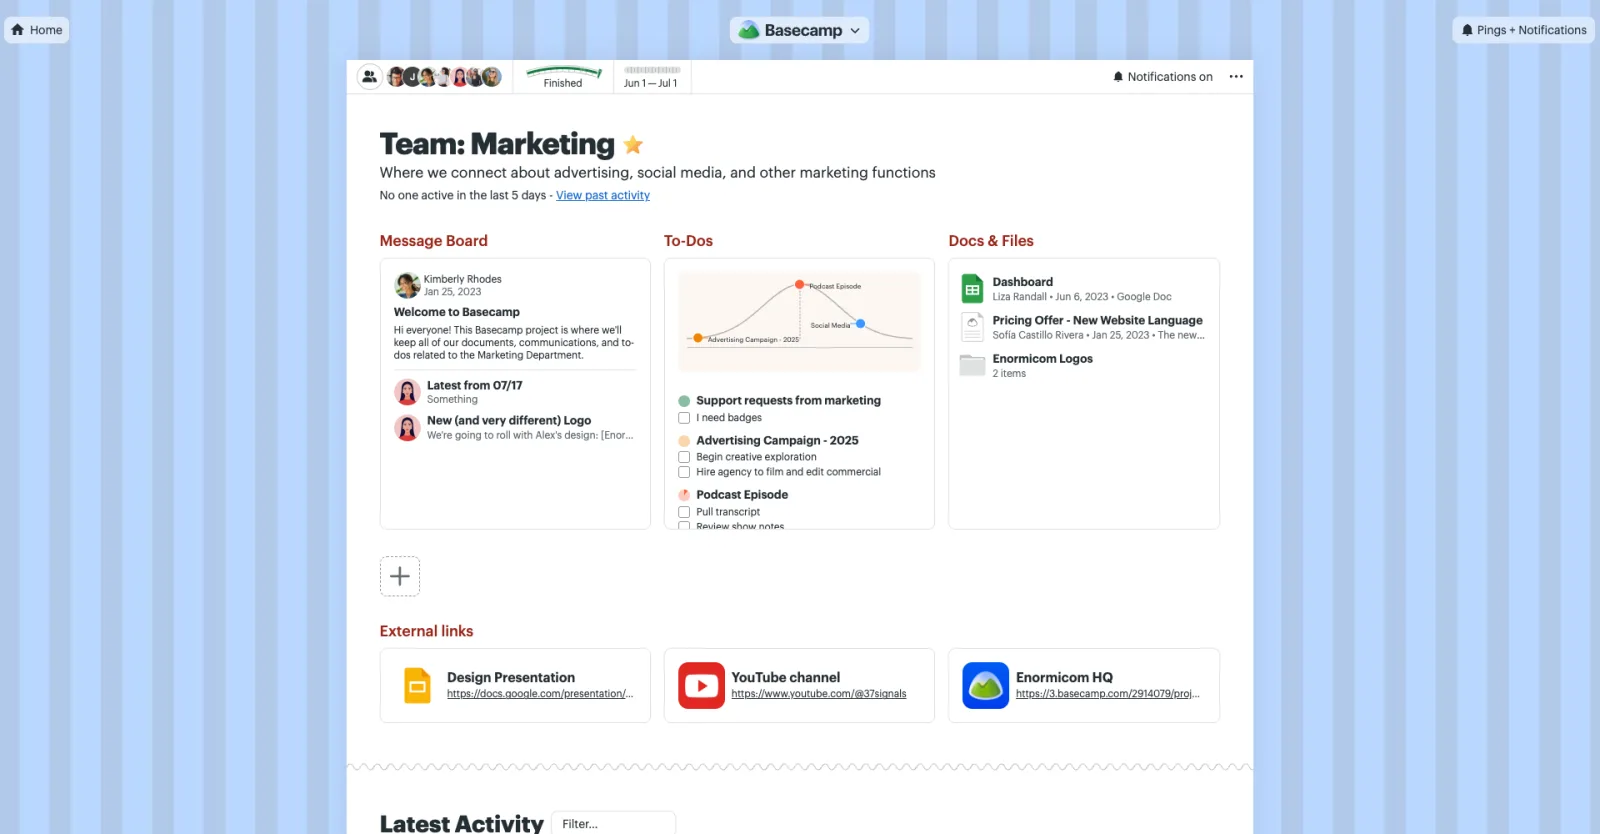
Use a subtle background pattern...
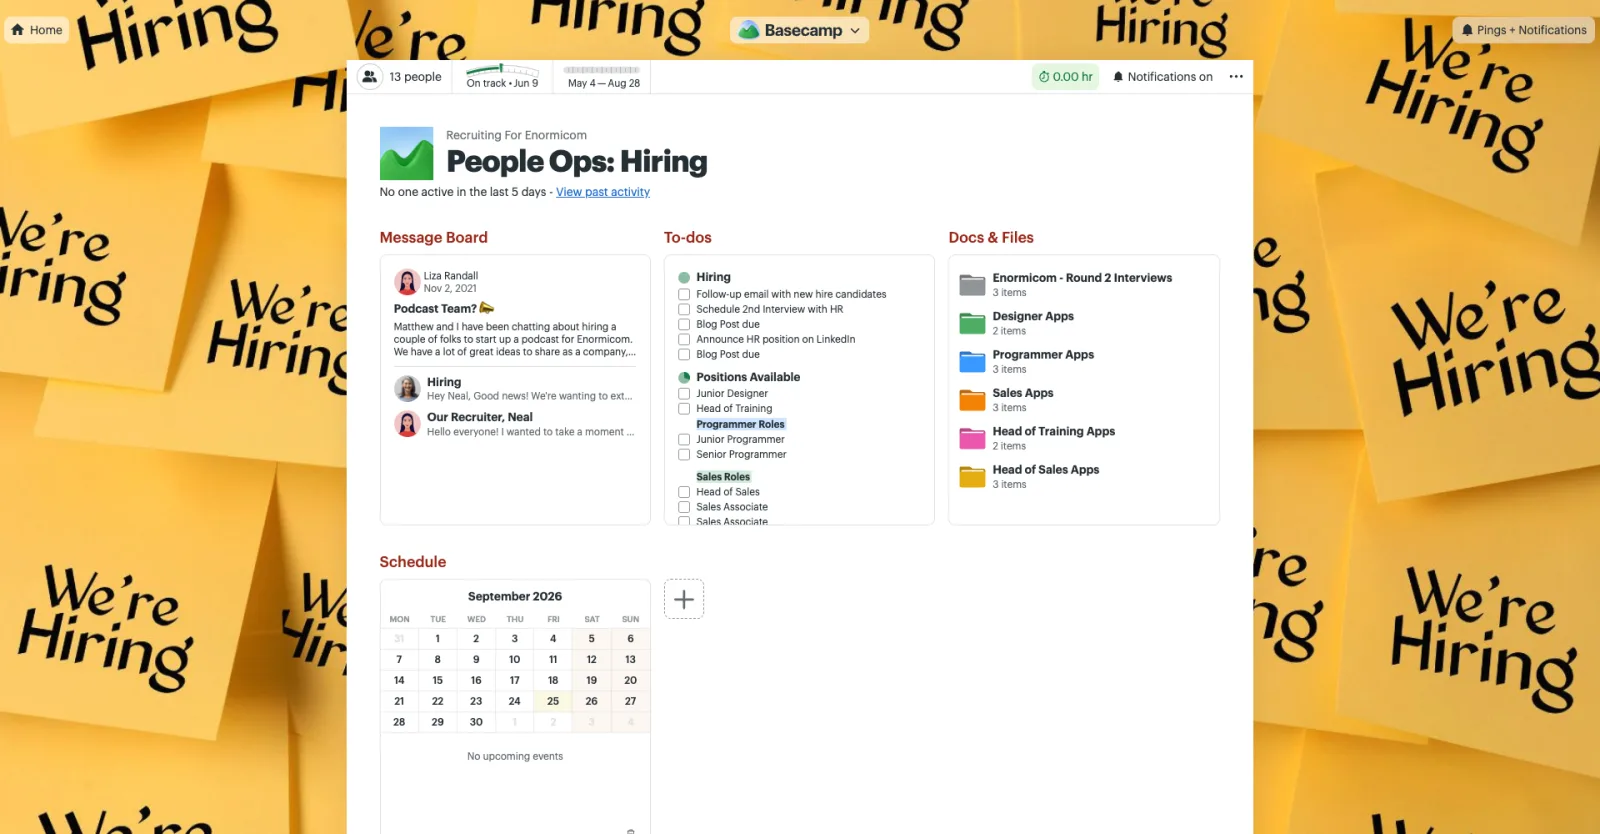
Or an image that represents the project.
To add a wallpaper, click the project name, then upload an image. Choose Fill Screen to stretch the image across the background or Tile to repeat it. Once it’s set, everyone on the project will see the same wallpaper.
Project wallpapers are available on the web and desktop apps. Give it a try! And good news… unlike actual wallpaper, it’s easy to remove.
Uploading files to a project just got faster. You can now drag files from your computer and drop them right onto Docs & Files from the project page — no need to open the tool first.
Drop one file or a whole bunch at once, and they’ll be added to the main Docs & Files area without sending a notification to anyone on the project. If you want to organize them into folders from there, you can.
That’s it! Drag, drop, done.
Group pings are great for pulling a few people together for a conversation, but until now, the group you started with was the group you were stuck with. If you needed to add a person or someone wanted to leave the conversation, you had to create a whole new thread and lose all that conversation history in the process.
Not anymore! Now you can add or remove people from group pings.
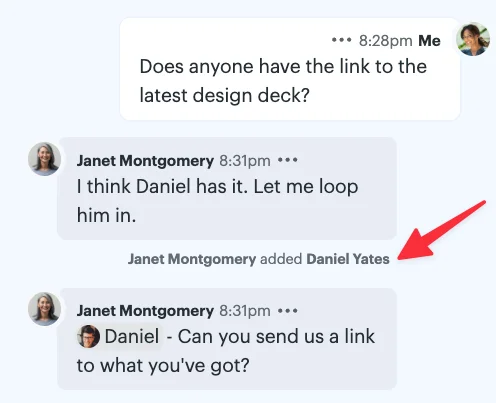
To make a change, click the names at the top of a group ping to add or remove someone from the conversation. You’ll see a note in the ping whenever the group changes, so everyone knows who’s come and gone.
Anyone in a group ping can add people, rename the ping, or change its image. When someone new is added, they’ll be able to see the full conversation history. Admins and the person who created the ping can remove people. And if you’re in a ping you no longer need to be part of, you can leave anytime.
Whether someone joins the group or bows out, you can keep the conversation going without starting over.
Templates are the way to go when you find yourself doing the same kind of work over and over again. Basecamp already has project templates for recreating entire projects and to-do list templates for those tasks you repeat all the time. Now, Card Tables have templates, too!
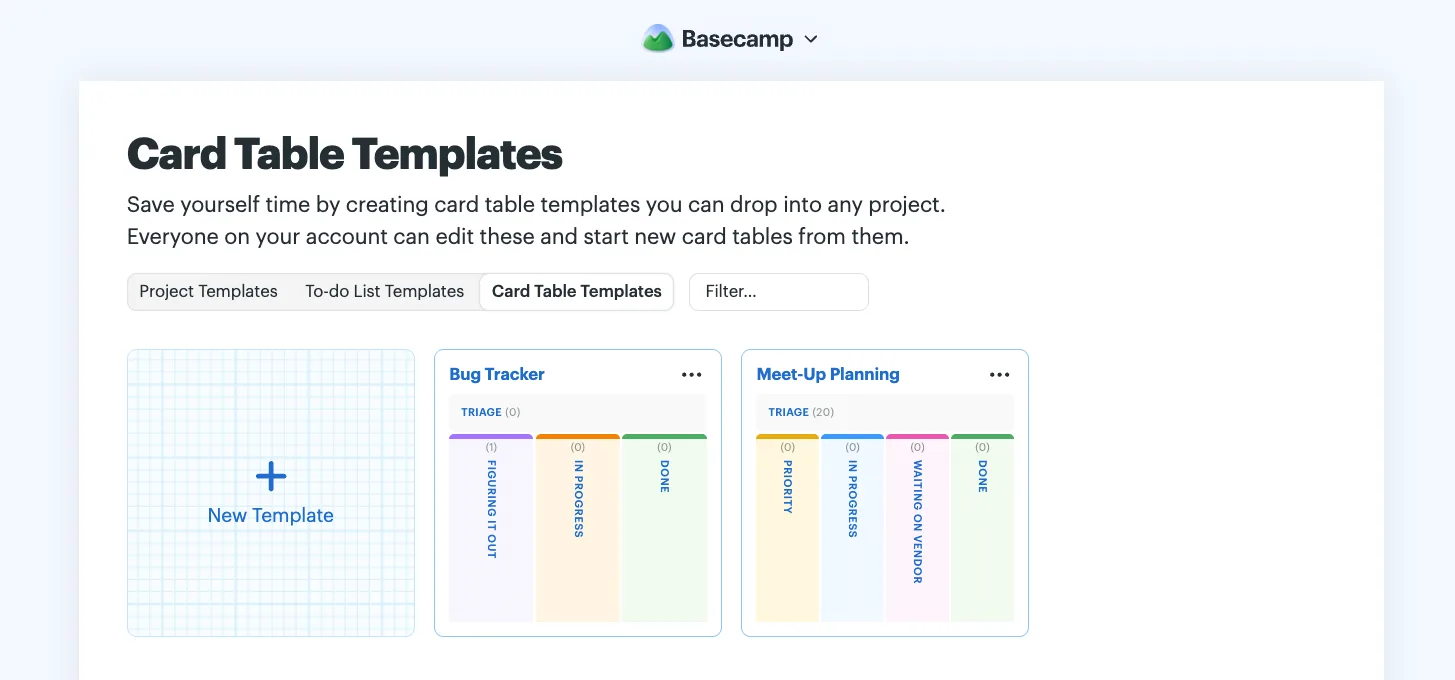
Jump to the templates page by typing Templates into the main Basecamp menu. Select Card Table Templates, then New Template to make one from scratch. Set up your workflow exactly how you’d like — add or rename columns, create cards, change colors, and more.
Have an existing card table you want to repeat? Turn it into a template with the ••• menu at the top right, then Save as a project template. Choose whether to include the people and comments from the original, and decide if all the cards should move back to Triage for a fresh start. Click Create template to save.
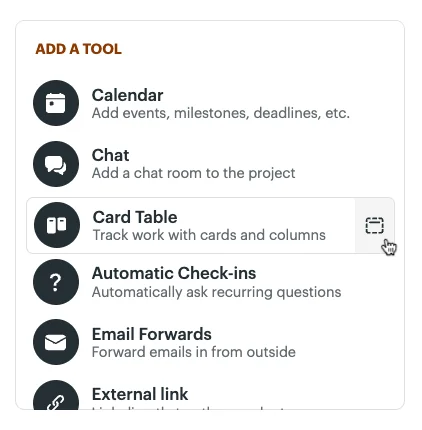
Use your template anytime you add a new Card Table tool to a project. Click the template icon to the right of the Card Table tool, then choose the template you want to use. Basecamp will spin up a fresh copy with everything already in place.
And there’s a little something for to-do lists, too! You can turn any existing to-do list into a template. Open the ••• menu at the top of the list, select Save as template, and you’re all set.
Whether it’s a Card Table or a to-do list, templates make recurring work that much easier. Build it once, use it again and again.
Sometimes a list of files is exactly what you need. Other times, you want to see everything at a glance.
That’s why we’ve added a new grid view to Docs & Files, perfect for viewing photos, images, and videos, or simply browsing your files that way.
Use the toggle to switch between a list and a gallery-style grid.
The choice of grid or list is personal to you. Even better, it’s specific to each folder, so you can use whichever view makes the most sense for what’s inside. View your contracts or meeting notes as a list and your remodel photos or logo designs as a gallery.
Have a bunch of photos or videos in a project that you want in a single gallery? Add a dedicated Docs & Files tool for them. They’ll look great right on the project page, and one click opens the whole collection as a gallery.
Whether you’re collecting inspiration, reviewing designs, or sharing event photos, the gallery grid is a perfect way to browse your visual content. Here’s a quick video to show you how it works.
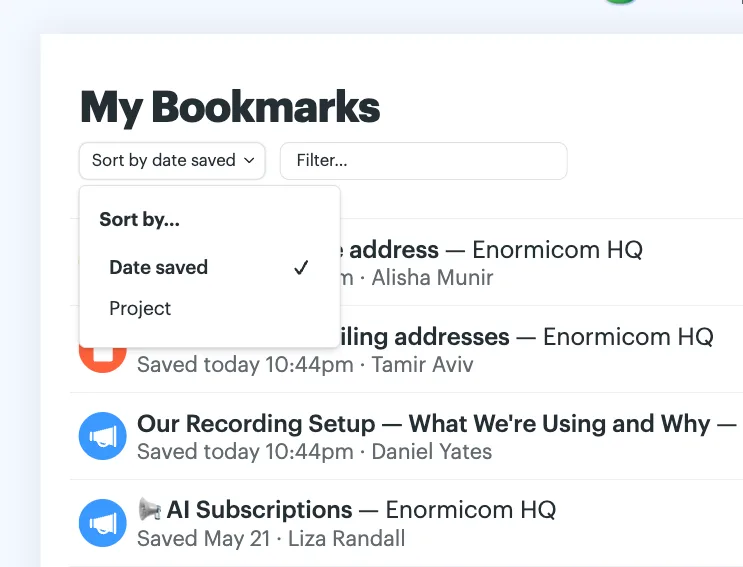
We added a little organizational polish for your bookmarks. Before, they were listed in the order you saved them. Now, you can sort them by Date Saved or Project, making it easier to find what you’re looking for.
We’ve made a change to how activity is displayed on a project page. Before, you’d see the three most recent updates at the top, with the full activity timeline on a separate page. The more we lived with it, the more we wanted the whole story in one place.
Now, simply scroll below your project tools to see what’s been happening, in order, without having to go anywhere else. Or, click View activity near the top to jump straight to it.
And since activity no longer takes up space at the top of the project page, we’ve removed the toggle to show or hide it.
Not everything in a project is created equal. Some parts deserve a little extra attention, like the big launch date on the calendar, the folder of the latest brand assets, or the message titled “READ ME FIRST!” (All caps so maybe people will notice it.)
Now you can surface them right on the project home page with Spotlights.
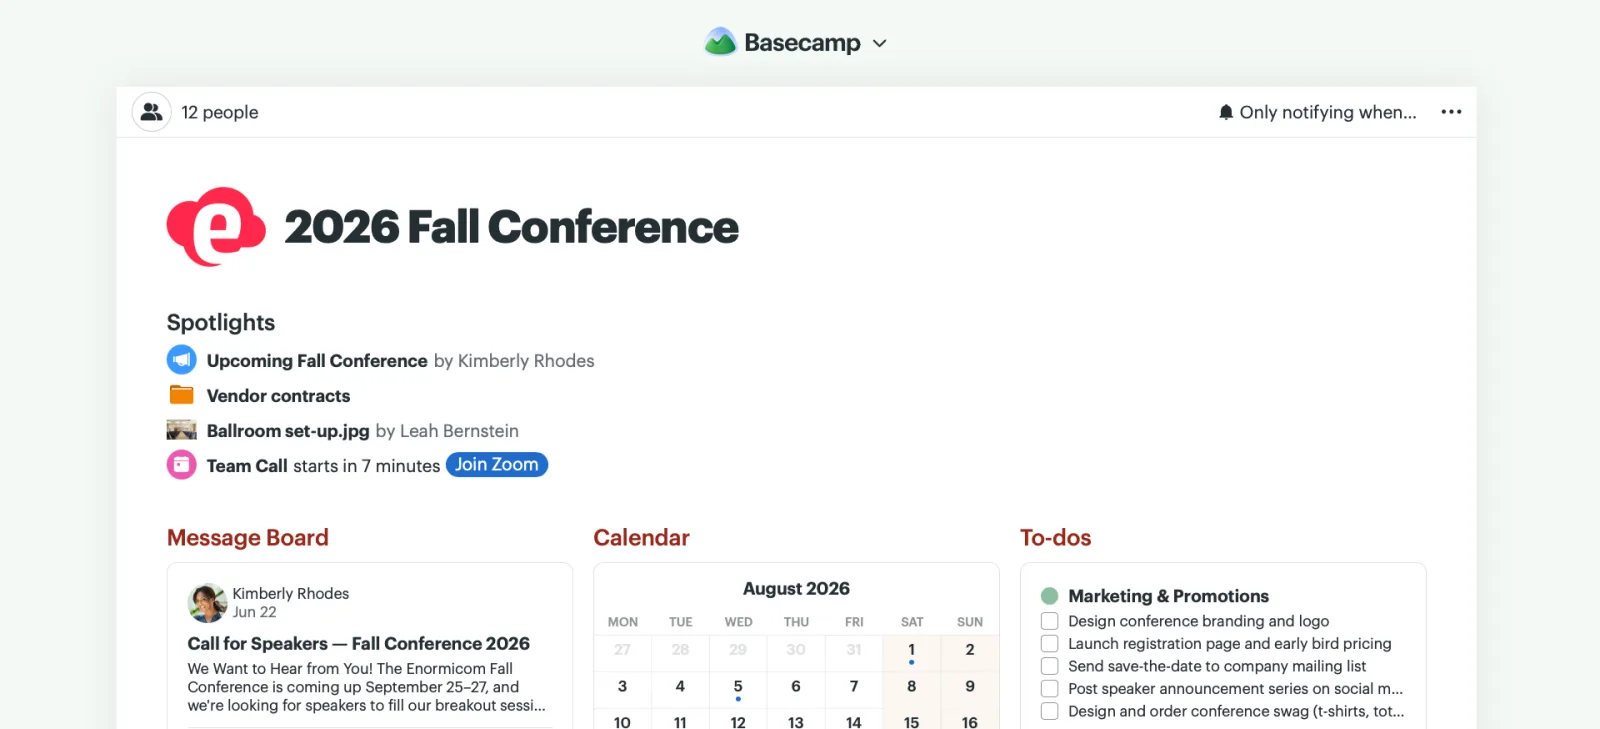
To add one, open the item you want to spotlight. Click ••• in the upper-right corner and select Spotlight on project page.
You can spotlight just about anything — messages, cards, Card Table columns, To-Do lists, files, and more. Add as many as you need and drag them into whatever order you like. Spotlight an event and you’ll get a live countdown 15 minutes before the start time, plus a join link if there is one, right on the project page.
When something no longer belongs in the spotlight, click the ••• menu and select Remove Spotlight.
Spotlights keep what matters most front and center, so no one has to go digging for what you need them to see. Want to see them in action? Check out this quick video.
Printing may not be the flashiest or most used feature in Basecamp. But when you need it, it should just work.
We recently went through 100 different screens across Basecamp, printing and saving PDFs — everything from To-Do lists and documents to reports and timesheets. About a thousand PDFs later, print views are polished throughout the app.
The next time you need a to-do list on paper, a PDF of a decision thread, or a timesheet to hand to a client, print away! Your pages and PDFs should come out a whole lot nicer.
We’re excited to share some big improvements to the My Bar tray at the bottom of your screen. Here’s what’s new.
Now, links to your tasks, events, bookmarks, and notes open up full screen. The extra space makes the content easier to see, and the popups are no longer competing for focus with other stuff on the screen. The extra space has another benefit, too. You don’t have to click “See all” to expand to your full list of tasks or your entire schedule. Everything’s right there — just scroll to see more.
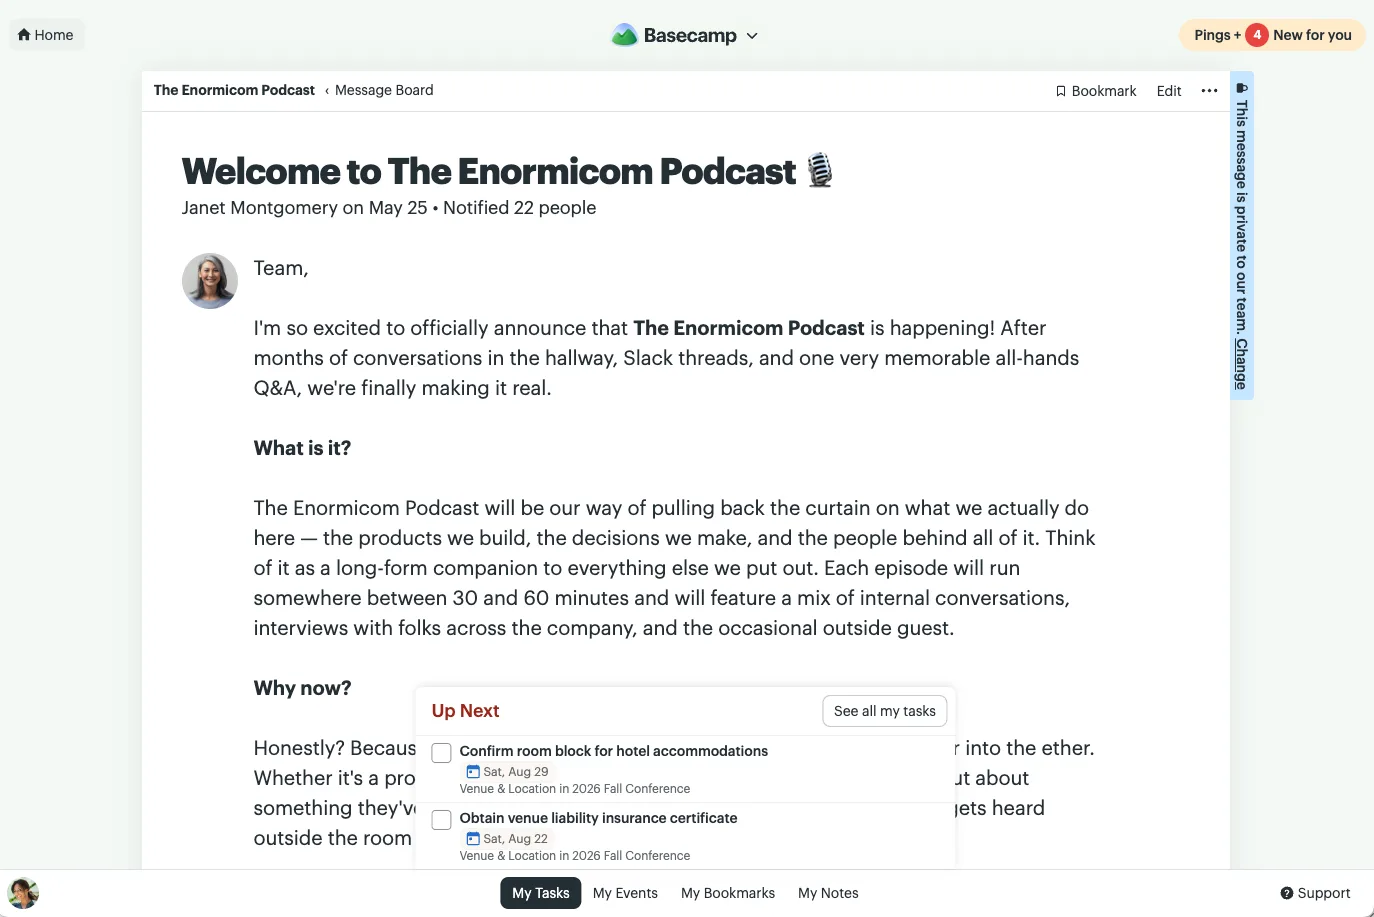
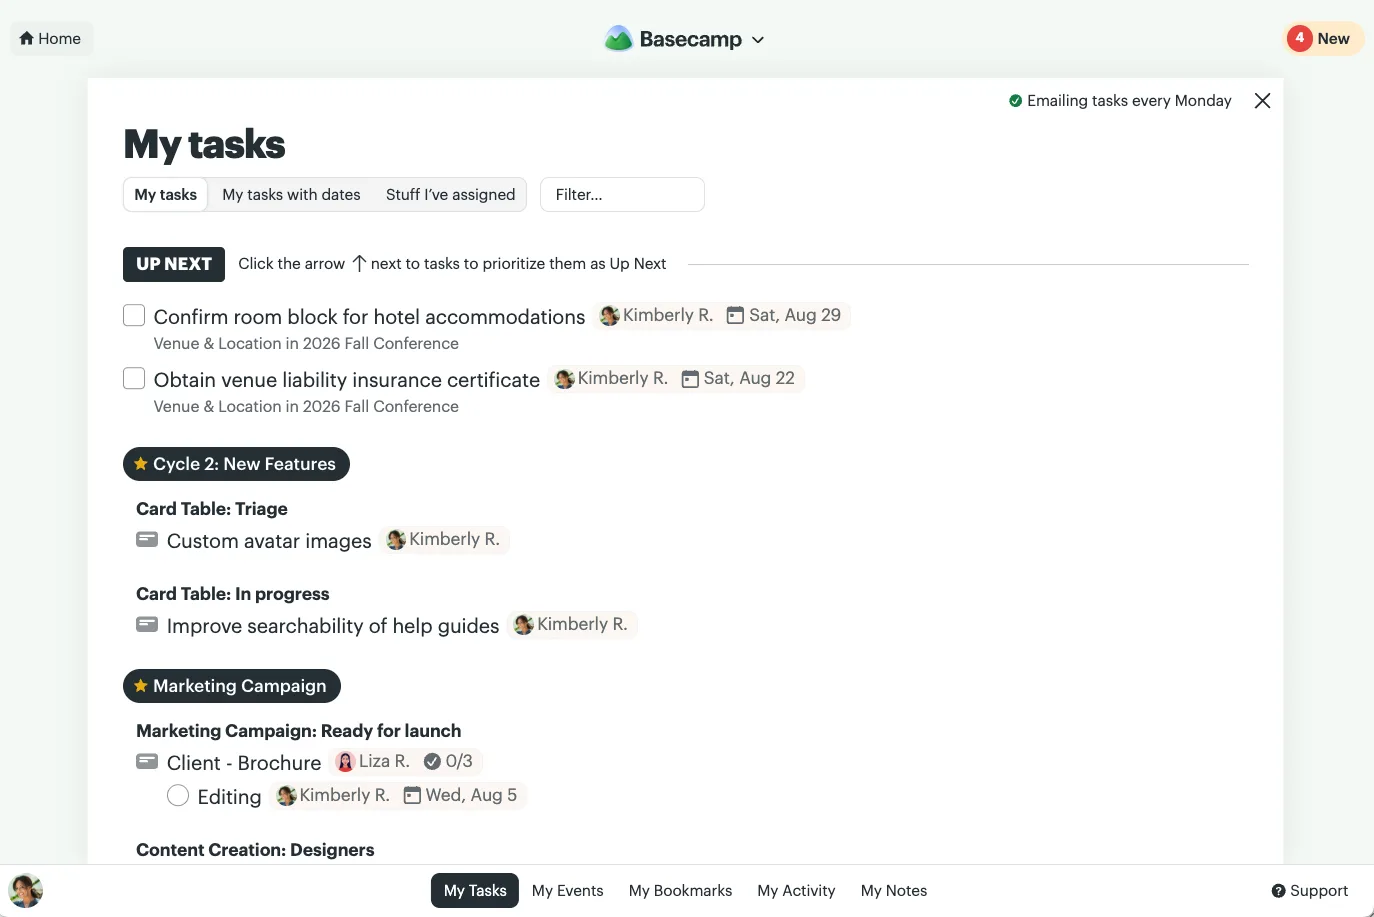
Like before, those links pop up on top of the page you’re on, so it’s easy to get back to where you were.
We also added filters at the top so you can easily find things right in place. Start typing to quickly narrow things down.
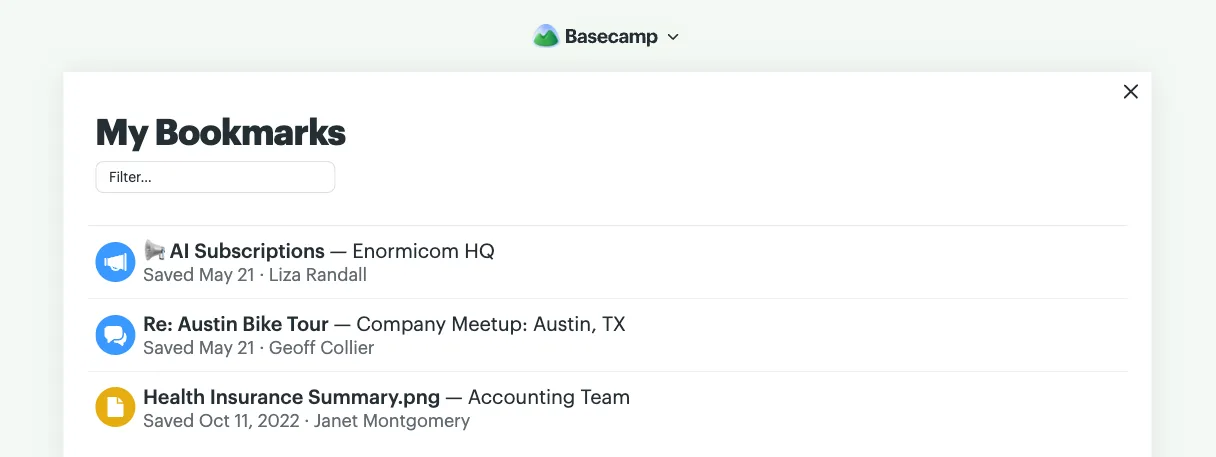
There’s also a new link in your bottom tray — My Activity. Now you can get back to a document you recently posted or add to a recent discussion you were a part of even faster. Click My Activity at the bottom of your screen to see it all. Use the filter at the top to find something specific, or simply scroll back through what you’ve been up to.
See the before and after in this quick video.
More room, less clicking, and a faster way to find what’s yours. We hope you enjoy the improvements!
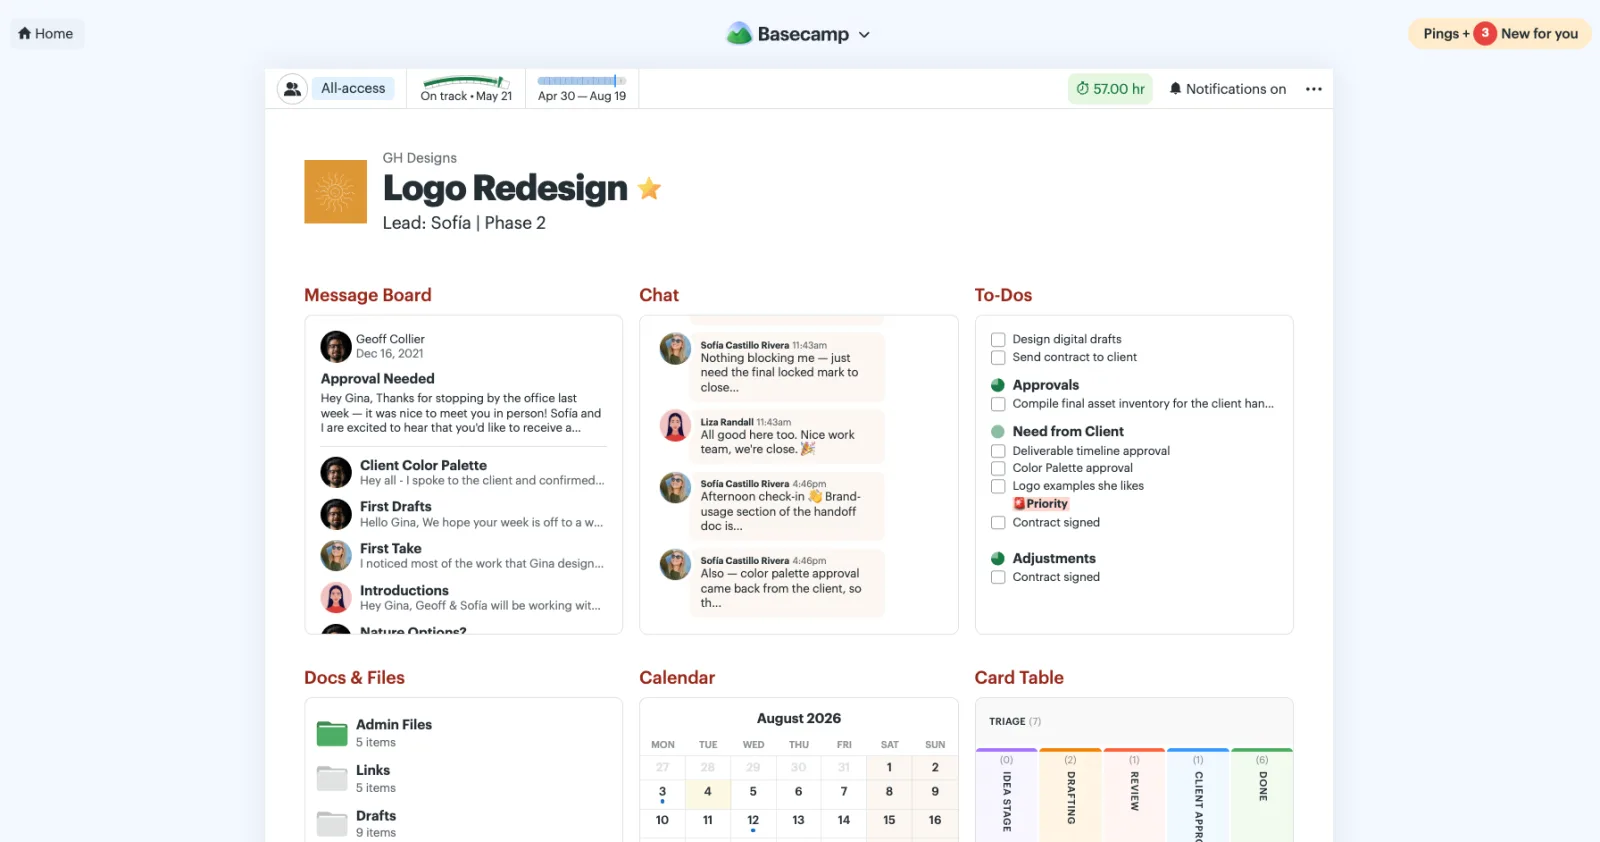
The biggest change is that the New for you button is moving to the top-right corner of your screen. Instead of clicking at the bottom of the screen to open your sidebar, you’ll now click New for you at the top right. It still opens the same sidebar you’re used to. It’s just in a new spot.
Why move it?
The old layout had you bouncing around the screen more than necessary. You’d click New for you in the bottom-right corner to open the sidebar, then head all the way to the top to see what was new. When you were done, you’d go back to the bottom again to close it. It worked, but it wasn’t the most natural flow.
With New for you at the top, your focus stays in one place — from opening the sidebar to reviewing what’s new to closing it again. Once we tried it, we loved it. We think you will, too.
The other big change is that unread pings are moving into New for you. Instead of keeping unread pings in their own section at the top of your sidebar, you’ll now see them alongside your other notifications. All your new activity is in one place.
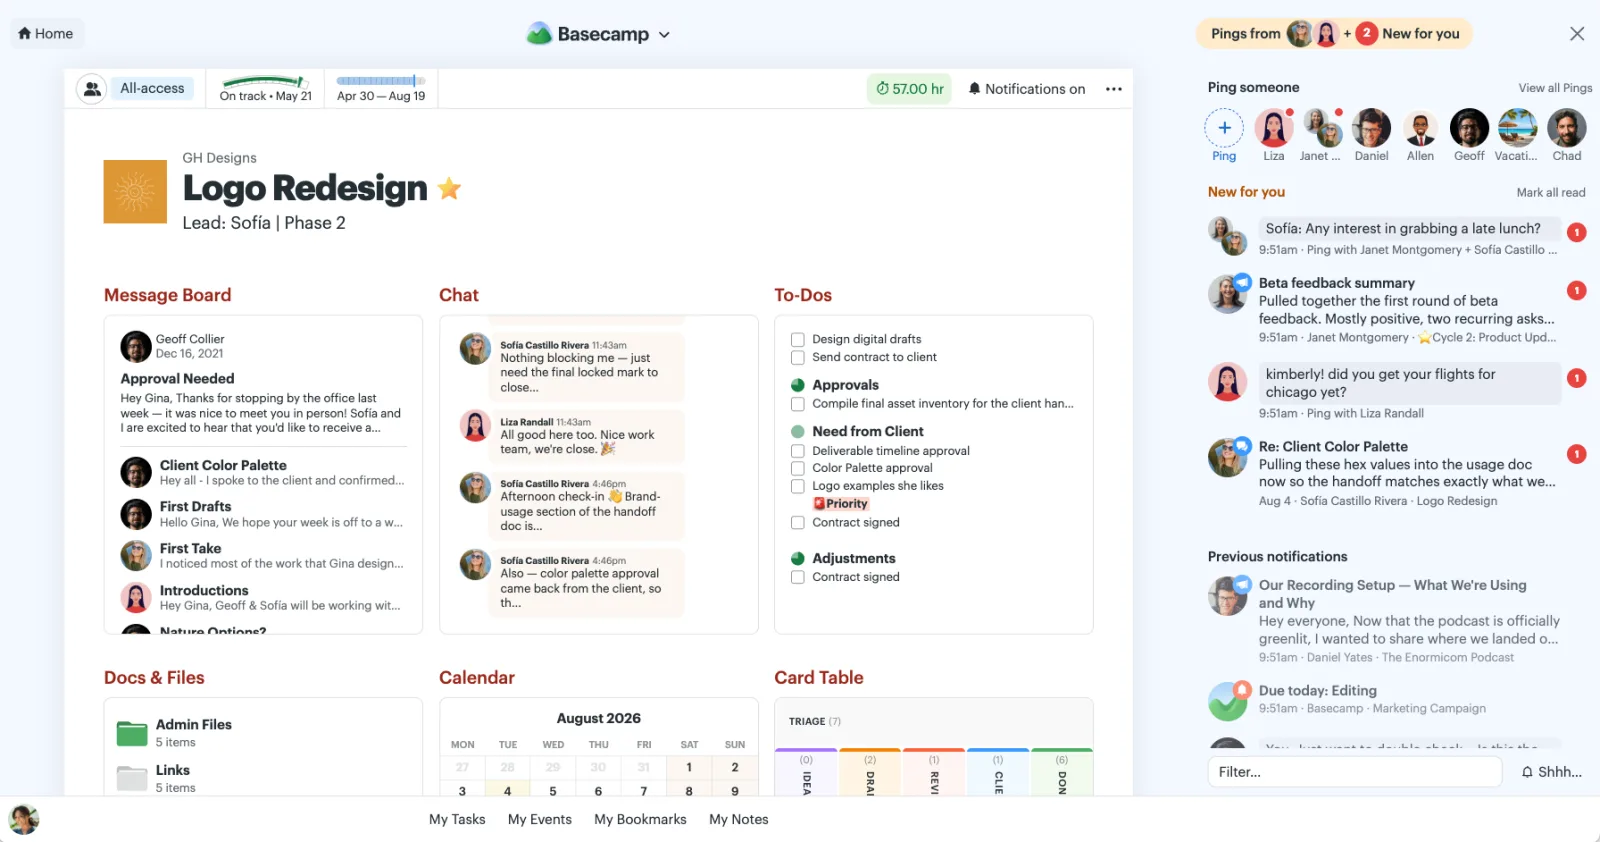
Now, when something is new, it shows up in New for you. Whether it’s a ping, an @mention, or another notification, there’s just one place to check.
There are a couple other nice improvements, too. Once you read a ping, it’ll move into Previous notifications, making it easy to find again later. Click ••• on a previously read ping to mark it unread, sending it back up to the New for you section.
You can even choose how your New For You list is sorted. Keep your newest notifications at the top, or always show pings first. Click the New for you header to adjust the toggle.
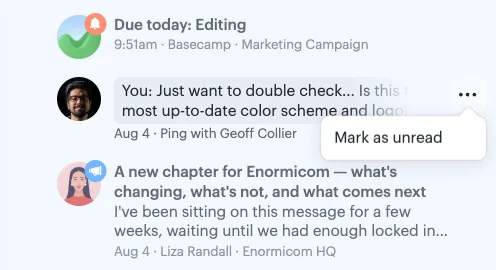
Click ••• on a previously read ping to mark it unread
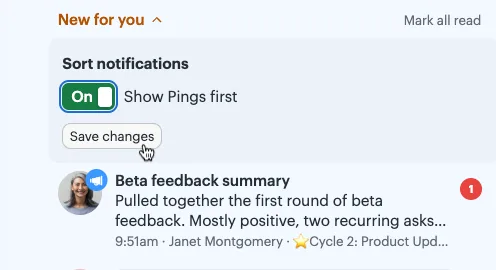
Click New for you to reveal the sorting options
I made this short video to show you the before and after of these changes. Give it a watch before the updates arrive tomorrow.
We hope these updates make it easier to keep up with everything that’s new in Basecamp.
The Everything page is a handy way to view messages, comments, files, and more across your entire account. We liked this all-in-one view so much that we decided tasks belonged there, too.
From the Everything page, select All tasks to see all to-dos and cards across your account, neatly grouped by project. Use the filters to drill down to a single project, show only to-dos or cards, or filter by assignee. You can also filter to see only overdue tasks, tasks with a due date, or tasks without one. Toggle subtasks on or off depending on how much detail you want to see.
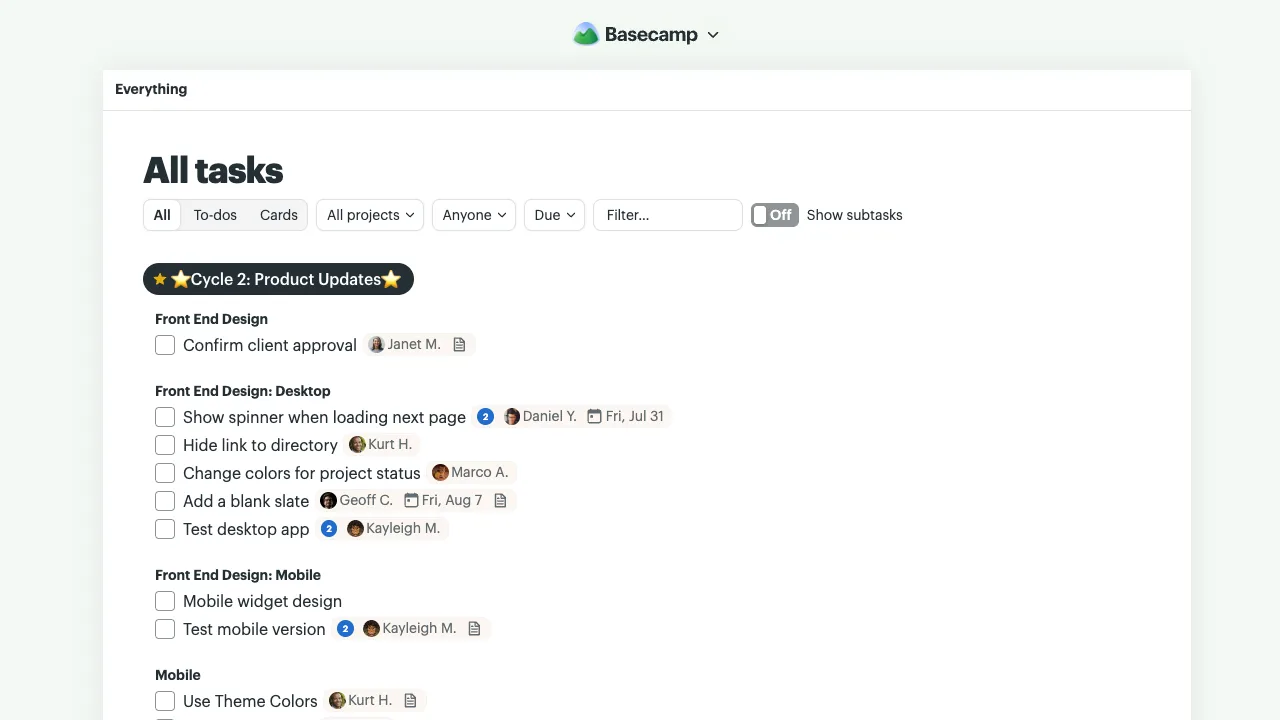
Whether you’re looking for one task or keeping tabs on everything assigned across your account, All Tasks puts it within easy reach.
We’ve also shipped a big round of accessibility improvements. Keyboard navigation is more reliable, screen readers do a better job announcing what’s happening on the page, and it’s easier to jump directly to different parts of Basecamp. We’ve also made significant improvements to writing and editing text, along with better keyboard and screen reader support for attachments and galleries.
There’s more accessibility work underway, too. We want Basecamp to be easy to use for everyone, including people who rely on a keyboard, screen reader, or other assistive technology.
Sometimes work needs to move from one card table to another. Maybe the support team needs to send a card to on-call or marketing is handing off a card to design. Before, moving a card between card tables took a few steps. Now, you can create a wormhole to connect two card tables together.
Click the ••• menu at the top right of a card table, then 🌀Add a wormhole. Select the destination and the column where cards should land.
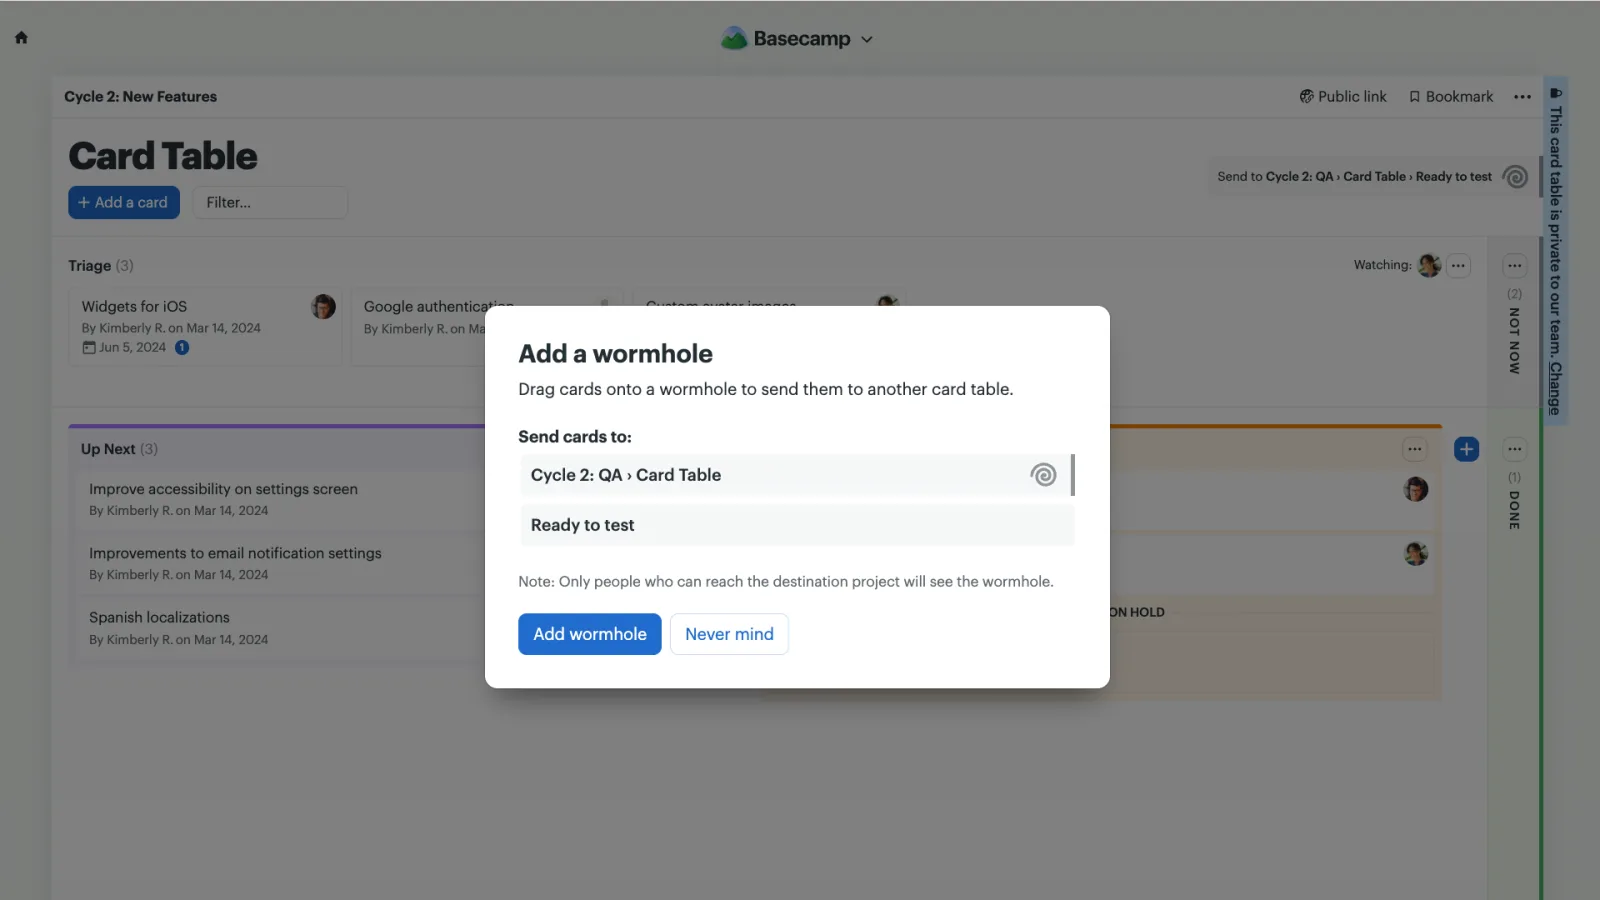
Once it’s set up, simply drag a card onto the wormhole to send it through. Moving work between card tables is as easy as drag and drop.
Watch this short video to see Wormholes in action.
Finding the right search result just got easier. By default, search shows results from all time, but you can narrow them to the last 7 days, 30 days, 90 days, or 12 months. It’s a simple way to zero in on exactly what you’re looking for.
Sometimes you want to see your calendar at a glance. Other times, you just want a simple list of what’s up next. Now you can toggle between both views.
Click Agenda to switch from the calendar to a list of your upcoming events and due dates.
Everything is grouped by day, so it’s easy to scan what’s coming up. And just like the grid view, you can filter the results to focus on your own schedule, the entire team’s events and tasks, or specific projects.
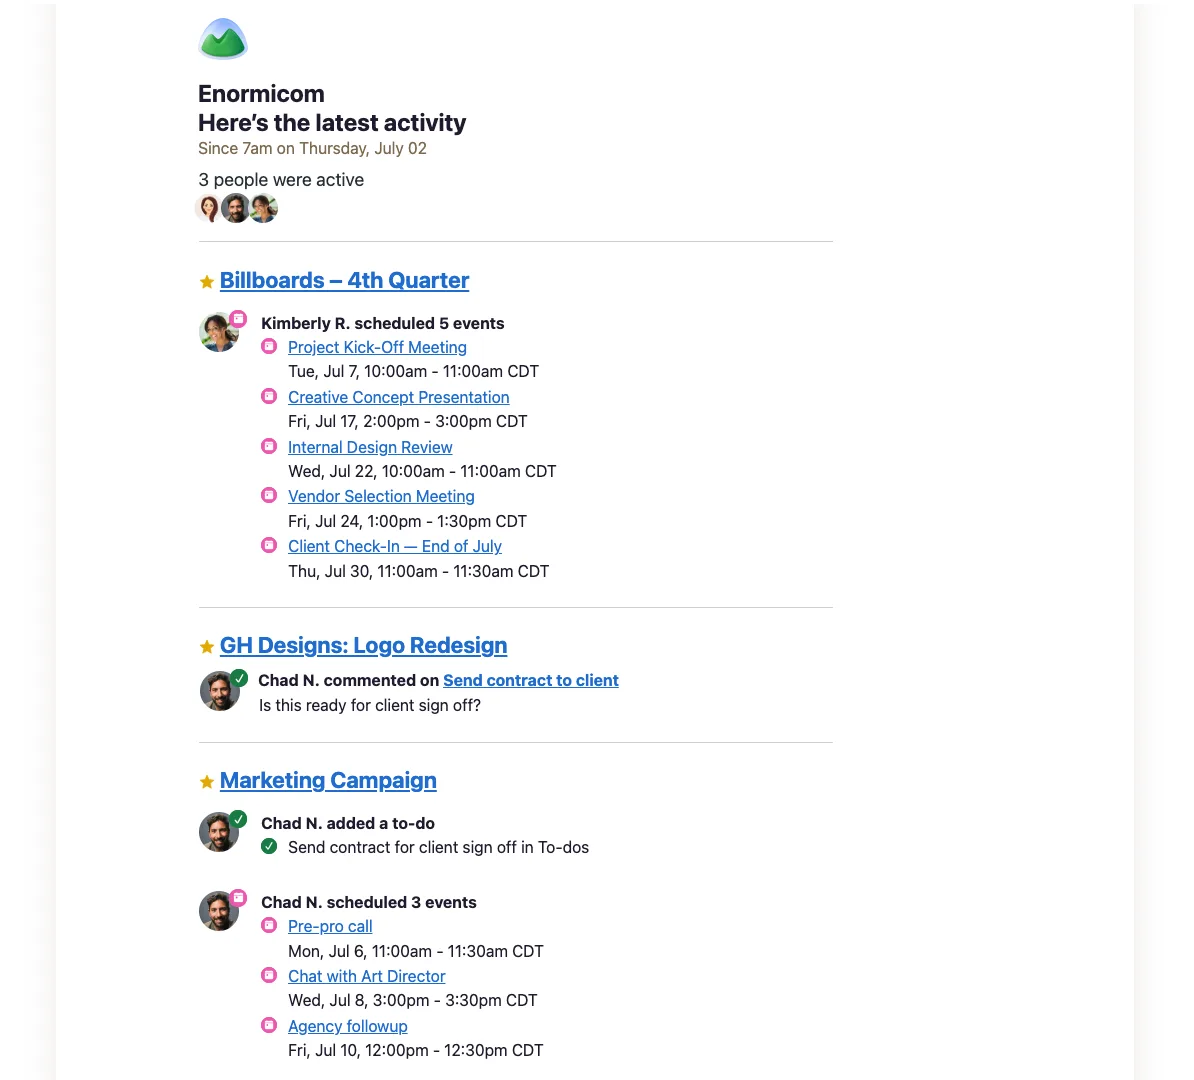
Want a quick recap of everything that happened in the last 24 hours? The daily activity email arrives every morning at 7:00 a.m. with a summary of activity across the projects you follow. Turn it on anytime from the top right of the Latest Activity page.
We recently gave the email a visual refresh. Related activity is grouped together, it’s clearer who did what, and the overall layout is cleaner and less cluttered, making it easier to catch up quickly.
We’ve continued improving accessibility throughout Basecamp. The notification sidebar now works better with screen readers and keyboard navigation, including clearer announcements and a smoother experience for those relying on assistive technology.
If you open an unassigned to-do or card and decide to take it on, just press SHIFT + K to assign it to yourself.
This is just one of the many keyboard shortcuts in Basecamp 5 designed to help you move a little faster. Curious what else you can do from the keyboard? Check out the full list of keyboard shortcuts.
We’ve updated the project settings so account owners, admins, and project creators can choose how people are notified. If someone doesn’t need every update, set that from the start instead of having them sort through needless notifications later.
Click the people icon at the top left of a project. Find the person in the list and click the notification setting to make adjustments — either notifying them when new things are posted or only when they’re @mentioned or already part of a discussion.
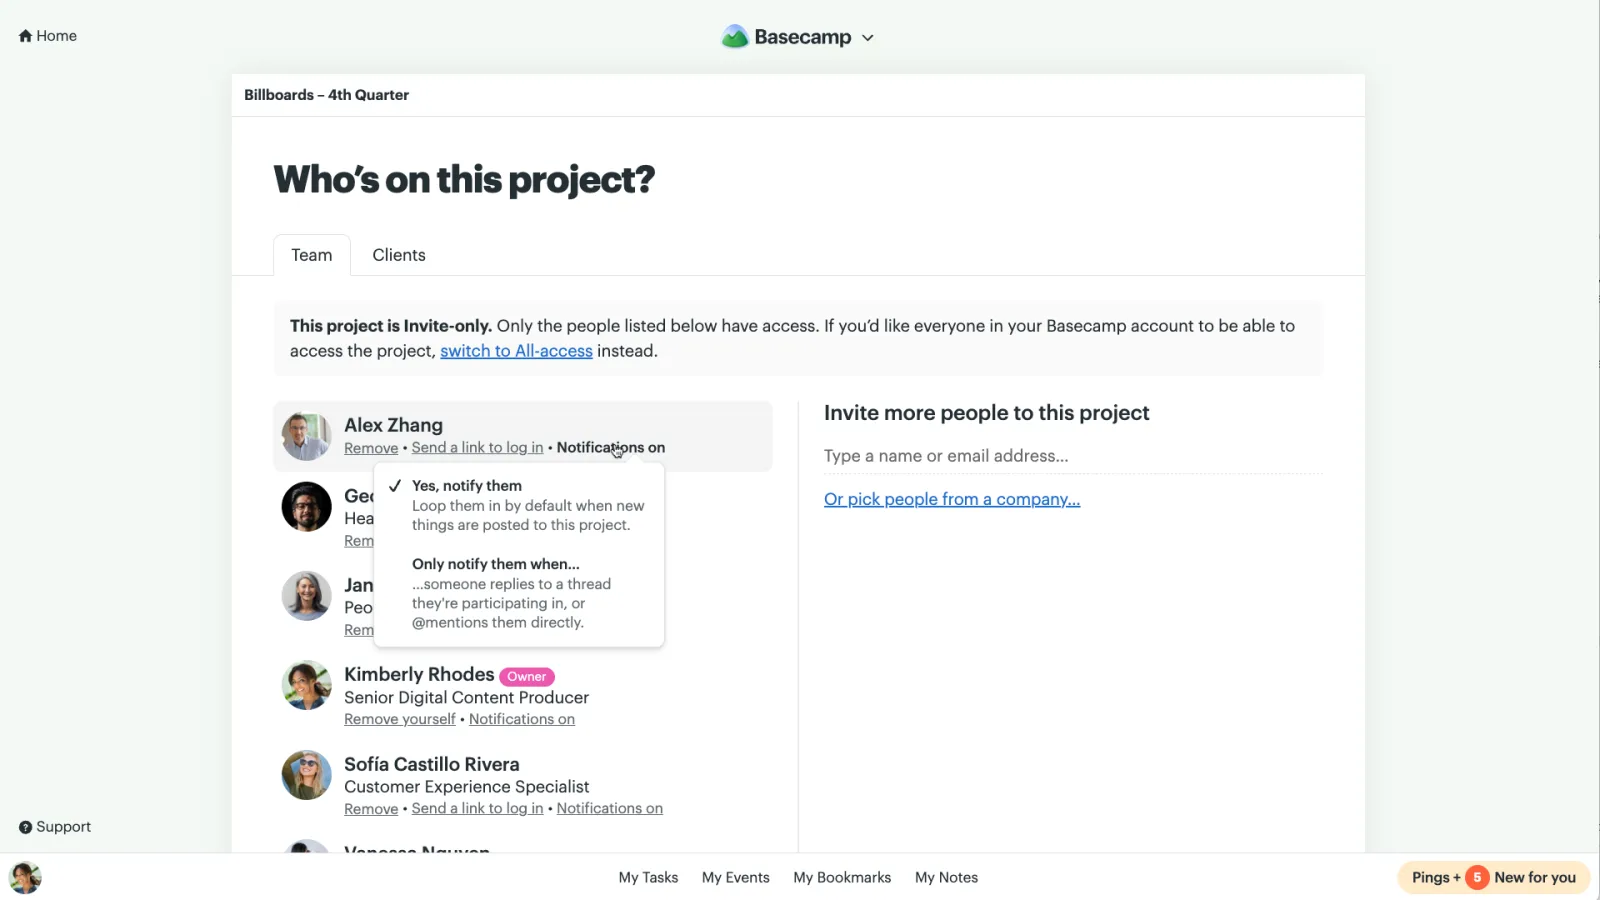
Everyone on the project can still adjust their own notifications, but it’s now easier to keep things quiet for those that don’t need every update.
Bubble Up brings work front and center when you need it. Snooze something now and have it float to the top of your notifications when the time is right.
We heard from some that Bubbled Up items are getting in the way of new stuff, especially when you have a lot. Now, you’ll see only the two most recent at the top of your sidebar. Click View more to see them all, including things that will bubble up later.
Bubble Up now is best for things you need to focus on today. For stuff that can wait, set it to bubble up in the afternoon, tomorrow, or next week. When something bubbles up, you’ll see it right at the top.
The streamlined Bubbled Up layout is available now on the web and desktop apps. It’s coming soon to mobile!
We launched Basecamp 5 roughly 48 hours ago and it’s been a whirlwind. We can’t thank all of you enough for reaching out with your questions, bugs, excitement, and frustrations. It’s all enormously helpful. We build Basecamp for you and your passion is infectious.
Our team is completely focused on answering every question and continuing to make Basecamp better. We’ve shipped over a hundred improvements, fixes, and polish so far, most of it thanks to the issues and ideas you’ve shared.
Here are some highlights…
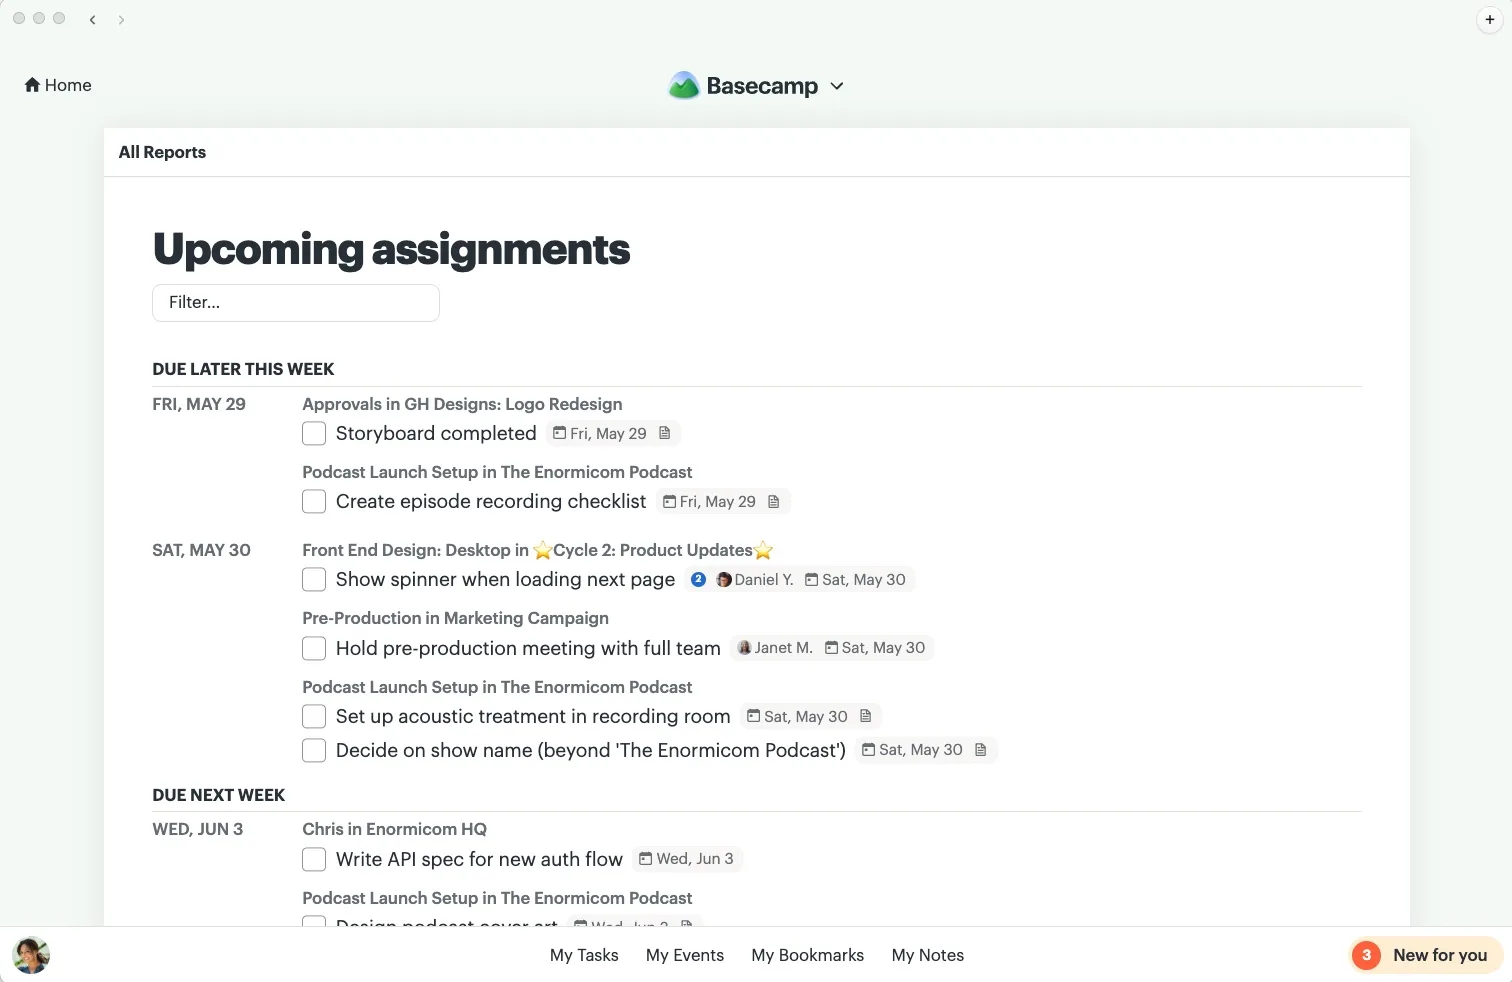
New: Upcoming assignments report. Basecamp 5 has a beautiful new calendar, but we know many of you relied on the Upcoming dates report to see what work is due soon. Upcoming assignments shows you cards and to-dos across all of your projects that have a due date.
New: If you’re only on one project, that project is where you’ll start when you visit Basecamp. Everything you need is right there. You can still get to Home, of course.
Improved: We made it easier to get to your full list of projects (including archived ones). Just click See all in the menu.
Improved: Creating folders on the home screen and rearranging folders and projects is smoother.
Improved: There were a few places where text was a touch too small. We’ve bumped it up and will continue to dial it in elsewhere.
Improved: Performance has been proved in many places, especially the Activity page. If you have a lot of people, projects, and activity, it should be much better for you.
Fixed: We brought back the option to sort Docs & Files by when something was updated.
Fixed: We also brought back sorting Messages alphabetically.
Fixed: When assigning someone work, you can decide whether to notify them.
Fixed: There were a few places where to-dos were shown, but didn’t include which project they were from. We patched that up.
Fixed: You can choose a start date when creating a project from a template again.
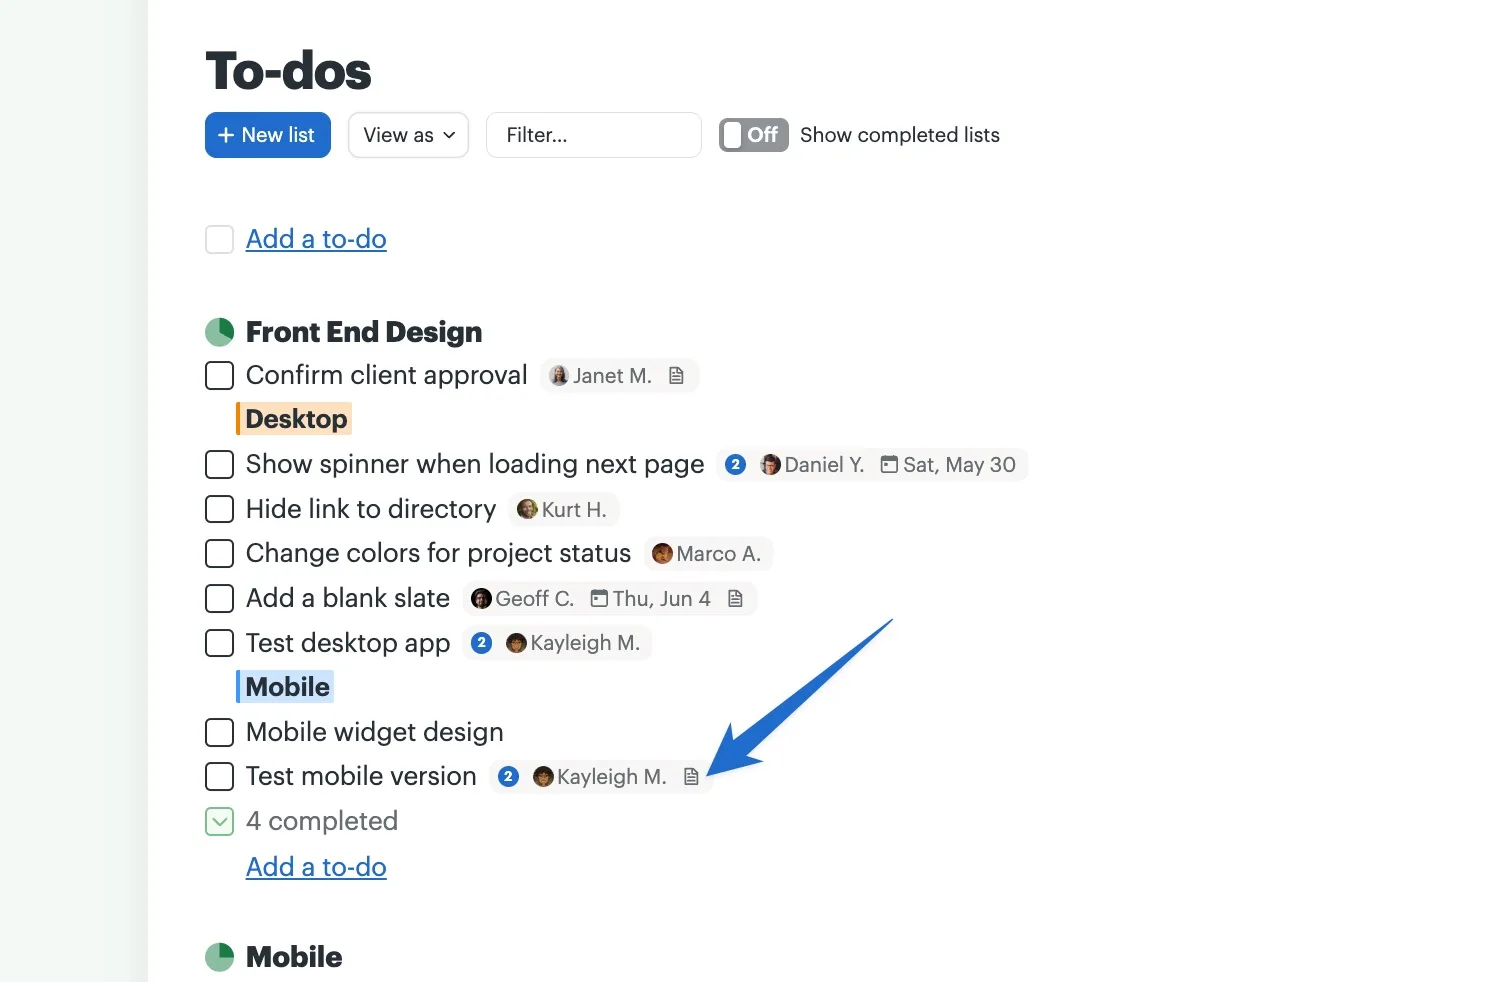
Fixed: You’ll now see a handy icon on any to-do that has a note.
Our iOS, Android, and desktop apps have also received multiple updates with fixes, polish, and performance tuning. Much more is on the way, including easy access to your drafts, boosts, and more.
Please keep the feedback coming — questions, bugs, and everything in-between. Reach out to support@xn--80akhigjeyrwql5c.xn--p1ai or click the link in the bottom left corner, just above your avatar.
When you spend a lot of time in Basecamp, every click counts. Basecamp 5 has a bunch of new keyboard shortcuts so you can move faster, navigate between screens, and do common actions without taking your hands off the keyboard.
Hold down SHIFT to see the available shortcuts, then hit the designated key to take action. Once you discover your favorites, you’ll wonder how you worked without them.
Check out xn--80akhigjeyrwql5c.xn--p1ai/keyboard for a cheat sheet of all the keyboard shortcuts, and watch this video to see a few in action.
We built a new text editor to make writing in Basecamp the best possible experience. It includes three big new features.
- Tables: Some details are easier to organize in a grid, like an expense report or project timeline. Use the ⊞ icon to add a table, then adjust the number of rows and columns. Already have the information you need in a separate spreadsheet? Copy the cells and paste them directly into Basecamp.
- Voice Notes: When typing isn’t the easiest option, click the microphone icon and record a voice note. Prefer to keep comments in writing? Admins can disable voice notes in Adminland.
- Markdown: Fans of Markdown will be happy to know the text editor now supports it. Use Markdown shortcuts anywhere you can add text and it’ll automatically be formatted. You can paste Markdown from other tools, too.
Here’s a quick walkthrough of the text editor:
To-dos are at the heart of getting work done in Basecamp, and we’ve made improvements to help you stay on top of your projects.
- Stand-alone to-dos: Now you can quickly add to-dos to a project without making a list first. Whether you’re jotting down action items during a meeting or making a quick list of errands, you can drop to-dos into your project and organize them later. To-dos without a list stay at the top of your page. Drag and drop them into a list when you’re ready.
- Subtasks: Some tasks take several steps to complete, like prepping for a client presentation or publishing a newsletter. Now you can break a to-do into smaller subtasks! Just like To-dos, subtasks can be assigned and given a due date. The pie chart next to the to-do will fill in as subtasks are completed.
- We’ve also made it easier to focus on the work that’s left. Completed to-dos are now tucked away instead of taking up space, keeping the focus on what still needs to be done.
Take a quick tour of the updates: